Microsoft Internet Information Services (
IIS)
7.0 in Windows Server 2008 and Windows Vista provides a secure,
manageable platform for developing and administrating and hosting Web
applications and services. It has been completely redesigned and Restructured .
IIS
7.0 provides features and functionality for administrators to
effectively manage Web infrastructures; developers to rapidly build Web
applications and services; and hosters to Web hosting.
Following are some features of
IIS 7.0:
- IIS 7.0 provides features and functionality that enable administrators to reliably and effectively manage Web infrastructures.
- IIS 7.0 has a distributed file-based configuration system that enables IIS settings to be stored in web.config files along with the ASP.NET settings.
- IIS 7.0 provides a
cost-effective, more scalable Web server platform for delivering
reliable Web hosting to a broad set of customers.
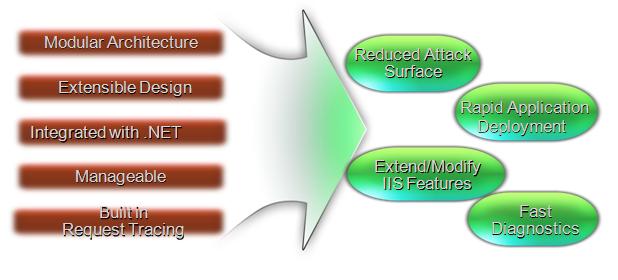
Major innovations in
IIS 7.0:
- A modular, extensible core Web server
- A unified, distributed file-based configuration system
- Integrated health monitoring and diagnostics
- A set of new administration tools with delegation support
For more features and product understanding,
check here.
The following diagram shows the Overall Architecture of
IIS 7.0 which contains
HTTP.Sys,
SvcHost.exe,
Application Pool and Worker Process(W3Wp).
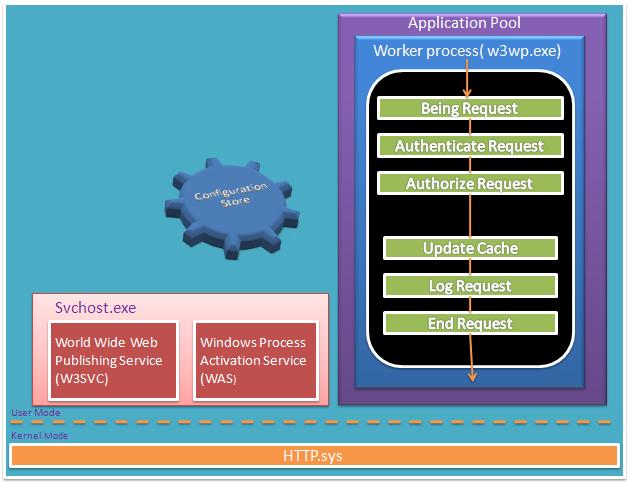
The main components of
IIS 7.0 are
HTTP.Sys,
Svchost.Exe,
Application Pool ,
Worker Process (W3WP.exe) and
Configuration Store.
HTTP.Sys: It the Kernel mode Protocol stack which listens to the HTTP and HTTPS Request. W3SVC and WAS are the parts of
Svchost.exe. W3SVC is the Listener of Request from kernel mode that is passed by the
HTTP.Sys. W3SVC also interacts with
Windows Activation Process which is managed by the worker process by starting, stopping and recycling the
application pool. It was also responsible for Health Monitor of
Application Pool during runtime. Configuration stores all
web.config and ASP.NET Settings and other configuration in XML Hierarchy form.
W3wp.exe is a long-running process that processes requests and generates responses.
The following diagram shows you the process flow of
IIS 7.0. This is the flow of User Request to
IIS and gets the Response from
IIS.
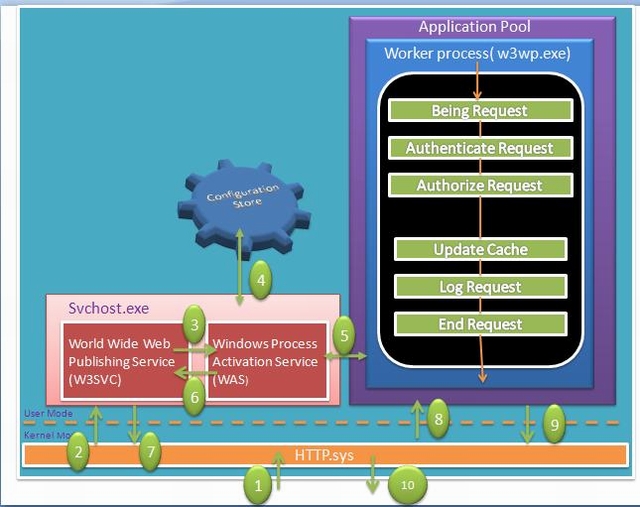
User Request Pass from Kernel Level to User Level Via
Http.Sys and then passes to svchost, and then goes to
Application Pool.
For more details, please
click here.
From now onwards, I will describe one example to deploy your ASP.NET websites on
IIS 7.0.
Step 1: From Visual Studio, publish your Web
application.
Step 2: Copy the published
application folder to
"C:\intepub\wwwroot" [default] folder.
Step 3: From
RUN - >
inetmgr ->
OK
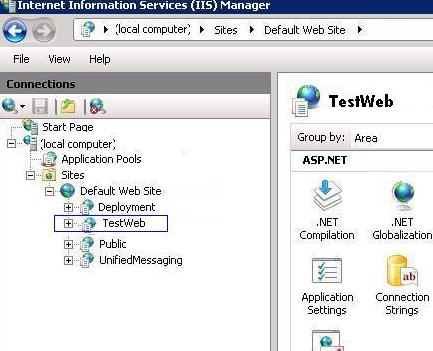
The following screen will come. This is the main page for any
application. There are three panels.
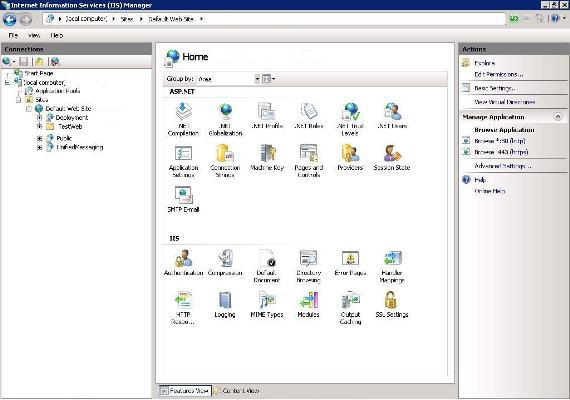 "TestWeb"
 is a recently pasted web
application on your
wwwroot folder.
Step 4: We need to convert it to an
application, just right click and then Click on "ConvertTo
Application" as shown in the following picture:

After converting it to
application, its icon will be changed and then you can set the property for your web
application from the middle pane. You can set
IIS Authentication Mode, Default Page Just like
IIS 6.0:
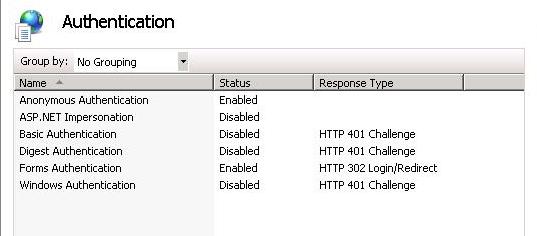
You can change Security Settings on Authentication Section. By default Setting will be set from your
web.config itself. As in my
web.config
Form Authentication was set that's why, Forms Authentication has been
Enabled. If we want to change the status, just double click and update
status to Enabled to Disabled or Vice Versa.
Now one most important part is to set the
Application Pool for your
application.
A site can contain many
applications including that site’s default
application, which is called the root
application. In addition to belonging to a site, an
application belongs to an
application pool, which isolates the
application from
applications in other
application pools on the server .
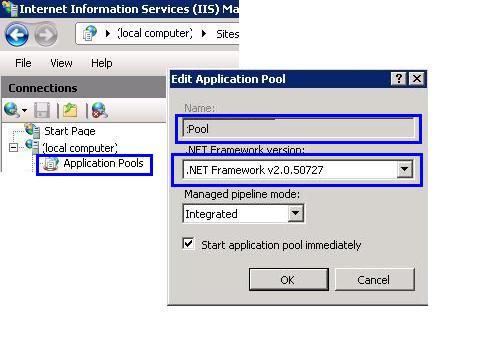
Step 1: Right Click on
Application Pool and give the name of your
pool. Here, I have given "
pool" and select Framework and click on OK:
 Step 2
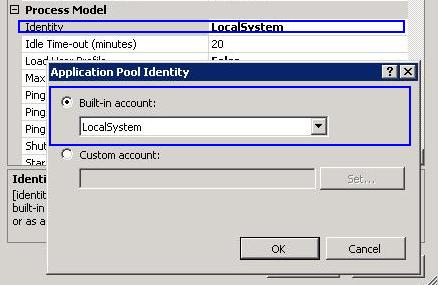
: If you are writing some thing on the server [may be writes Error Events Logs], you need to change the
Pool Identity to Local System. Right click on
Pool Identity setting as shown in the following image:
There are three identities of
Application Pool:
- Network Service
- Local Service
- Local System
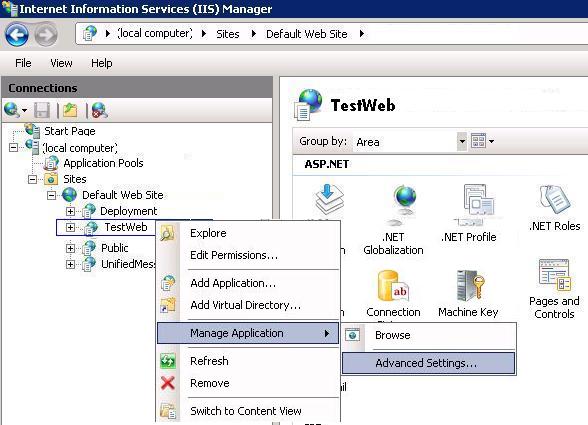
Now, we need to assign the
Application Pool to our web
application.
Step 1: Right Click on "TestWeb"
Application and Select
"Advanced Settings":
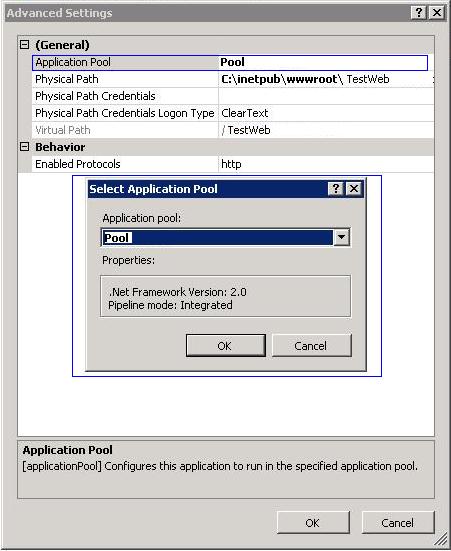
 Step 2
: Finally assign your created
Application Pool "
pool" to "
TestWeb"
Application.
Now you can run your
application by just typing
http:\\localhost\testweb and it can be accessible on network by IP also.
I have split this section into some parts. These are:
Application pools are used to separate set of
IIS worker processes that share the same configuration.
Application pools enable us to isolate our web
application for better security, reliability, and availability. The worker process serves as the process boundary that separates each
application pool so that when one worker process or
application is having an issue, other
applications or worker processes are not affected.
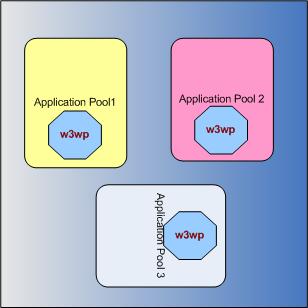
Figure: Application Pool With Worker Process On IIS Server
In your
IIS, there may be more on Web sites hosted and by creating
Application Pool, you can just assign a Separate Worker Process to your
application. I have already discussed how you can assign
Application Pool to your web
application.
There are two predefined
Application Pools is
IIS 7.0:
DefaultAppPool (Integrated) ClassicAppPool
None of the
Application Pools are Installed by default when
IIS 7.0 is installed. Classic
Application Pool is installed when ASP.NET 2.0 is installed in the System.
Application pool identity configuration is an important aspect of security in
IIS 7.0, because it determines the identity of the worker process when the process is accessing resource. This Settings comes form
IIS 6.0. in
IIS 5.0. There the
Application pool runs under the local system account. In
IIS 7.0, there are three predefined Identities that are the same as
IIS 6.0
| Applicationpool Identity |
Description |
LocalSystem |
LocalSystem is a built-in account that has administrative privileges on the server. It can access both local and remote resources |
LocalServices |
LocalServices built-in account has privileges of an authenticated local user account. It does not have any network access permission. |
NetworkServices |
This is the default Identity of Application Pool. NetworkServices has privileges of authenticated local user account and it can have access remote resource as machine account. |
This has already been discussed.
Creating Application Pool and Assigning it to a Web Application
By default each
Application Pool runs with a Single Worker Process (
W3Wp.exe). We can assign multiple Worker Processes With a Single
Application Pool.
An Application Poll with multiple Worker process is called "Web Gardens". Many worker processes with the same
Application Pool can sometimes provide better throughput performance and
application response time. And each worker process should have their own Thread and Own Memory space.
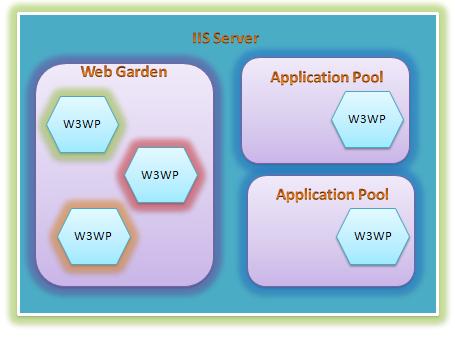
Fig: General Block Diagram of Web Garden.
As given in the picture, in
IIS Server there may be multiple
Applicationpool and each
application pool has at least a single Worker Process. Web Garden should contain multiple Worker processes.
There are certain restrictions to use Web Garden with your web
application. If we use Session Mode to "in proc", our
application
will not work correctly because session will be handled by different
Worker Process. To avoid this type of problem, we should have to use
Session Mode "out proc" and we can use "Session State Server" or
"SQL-Server Session State".
Main Advantage: The worker processes in a Web garden shares the requests that arrive for that particular
application pool. If a worker process fails, another worker process can continue to process requests.
Create a New
Application Pool.
Right Click -> Advance Setting -> Go To Process Model Section, set the Value for Maximum Worker Process.

It not always recommended to use Web Garden to your
Application. It effects the performance of your sites except in very specific cases like some long running synchronous requests or
application is very unstable.
The main advantages of
IIS 7.0 is Modular Design which gives some benefits to
IIS 7.0 over
IIS 6.0. The following table shows you some differences of
IIS 6.0 and
IIS 7.0.
|
Features
|
IIS 6.0
|
IIS 7.0
|
| Architecture |
Monolithic |
Modular |
| Setup |
Most Features Installed |
Minimum installation based on role |
| Extended Features |
ISAPI Filter and ISAPI Extension |
Added Module and handler in managed or native code |
| Customize UI |
Normal |
Customize for .NET |
There are many more differences.
IIS 7.0 will not be available with all Operating Systems. There are some specific OS and specific Versions for
IIS 7.0.
| Operating System With Edition |
Available |
| Windows Server 2008 |
Yes |
| Windows Vista (Home Basic) |
No (Default) need to install |
| Windows Vista (Home Premium) |
No (Default) need to install |
| Windows Vista (Business) |
Yes |
| Windows Vista (Ultimate) |
Yes |